


A 0DTE SPX trade can look safe right up until it is not. A short option may collect premium for hours, then expand in value violently as price moves, volatility shifts, and time disappears. That is why learning how to trade defined risk SPX is not about finding a better alert or calling the next intraday move. It is about engineering each trade so one bad outcome does not get a vote on whether you keep trading tomorrow.
Defined risk is the starting point. It is not the whole system. The OCC’s options education is a good grounding in the structures behind it. A long option paired against every short option gives you a maximum loss, but the structure still needs a reason to exist, a size that fits your account, and rules you can execute under pressure.
What Defined Risk Actually Means in SPX
A defined-risk position has a known worst-case loss at entry, excluding ordinary execution differences and fees. In SPX, that usually means a vertical credit spread, iron condor, iron fly, butterfly, or another structure where every short option is protected by a farther-out long option.
The key word is known. Before you enter, you should be able to answer three questions without hesitation: What is my maximum loss? Where does that loss occur? How much of my planned daily or weekly risk does this trade consume?
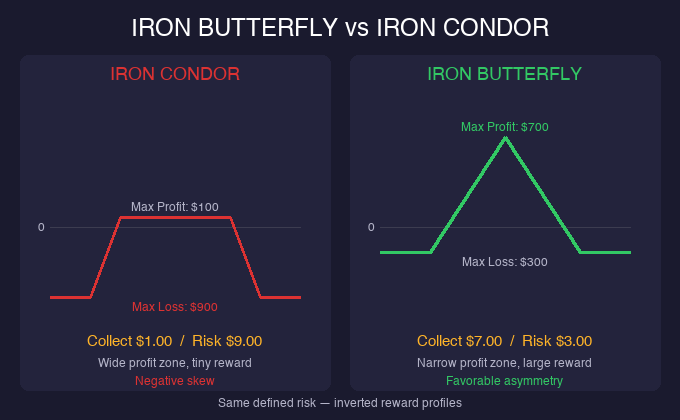
A credit spread is not low risk because it has a high probability of expiring out of the money. It has defined risk because the long option caps the damage if price keeps moving. Those are different ideas. Retail traders often confuse a small credit with a small risk. On a wide spread, the credit can be small while the loss potential is many times larger.
SPX is useful for structural traders because it is a broad index with deep options markets and frequent expirations. But its 0DTE options can also reprice fast. Near expiration, gamma is not a theory. It is the reason a position that felt distant from price at noon can become urgent twenty minutes later.
How to Trade Defined Risk SPX: Start With the Risk Budget
Do not start with the chart. Start with the amount you are willing to lose if the trade is completely wrong.
Set a fixed risk unit for a normal trade, expressed as a small, predetermined portion of trading capital. Then calculate contracts from the structure’s maximum loss, not from the premium you hope to collect. If the defined loss on one spread is larger than your risk unit, the answer is not to negotiate with yourself. Use a narrower structure, choose a different setup, or pass.
This is where many traders sabotage a sound idea. They see a familiar pattern, feel unusually confident, and add contracts. Confidence does not change the payoff graph. It only changes how much damage a normal losing trade can do.
A workable framework also includes a maximum amount of open risk. If you add a second or third position, treat the portfolio as one book. Positions that look different can still carry the same directional exposure. A put credit spread and a bullish iron condor, for example, can both be vulnerable to the same downside move.
The purpose is not to avoid losses. You will have losses. The purpose is to make a loss a planned rep rather than an account-level event.
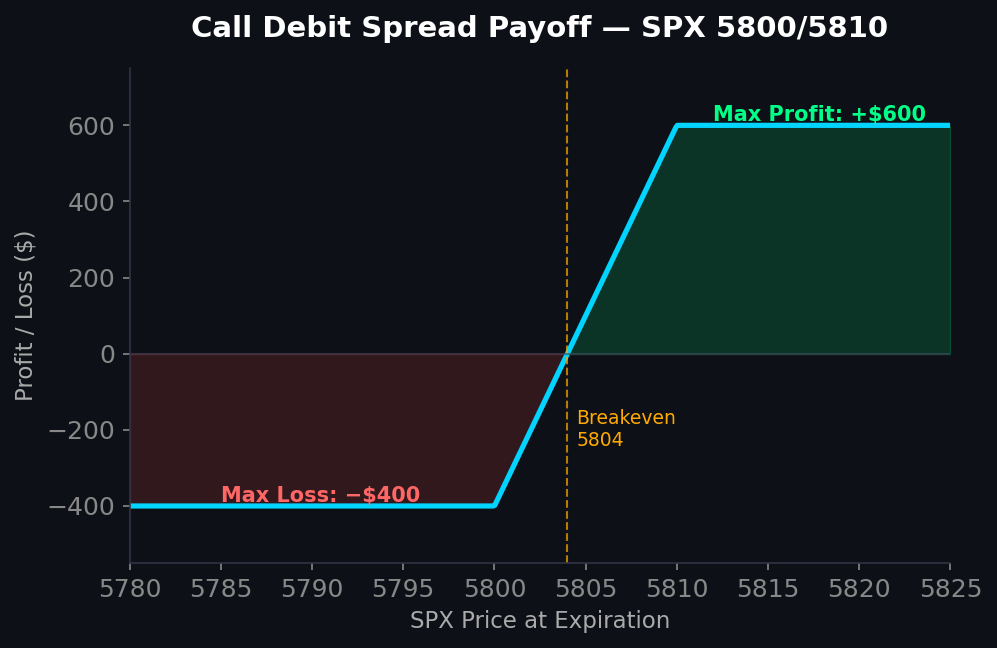
Choose Structure Based on the Market Condition
Defined risk does not mean every structure belongs in every market. The structure should match the condition you are actually trading, not the condition you wish would appear. Compare the full menu of spread structures and when each fits.
When price is balanced around a well-defined area and implied movement is sufficiently priced, a range-oriented structure may make sense. When price is moving with acceptance away from a key level, a one-sided defined-risk spread may offer a cleaner expression. When the market is near a major positioning level, a tight-risk structure can be appropriate only if you understand that the same proximity that creates opportunity also creates faster risk.
This is positioning over prediction. It is the core of our guide to structural SPX setups. You do not need to announce where SPX will close. You need to identify where risk is concentrated, where the market is accepting or rejecting price, and how your chosen payoff behaves if your read is incomplete.
Useful inputs can include the day’s opening behavior, prior session reference points, expected move, realized intraday range, and options positioning such as gamma exposure. None of them is a signal. They are context. Context helps you decide whether premium is worth selling, where a structure is vulnerable, and when there is no clean trade.
No-trade days are part of the framework. If the market is disorderly, your levels are unclear, or the position would require oversized risk to create meaningful distance, standing aside is execution. It is not missed opportunity.
Define the Trade Before the Fill
A trade plan needs more than strikes and a credit. Write down the thesis in plain language. For example: price is holding above a reference level, the expected range supports a defined downside spread outside that area, and the position will be reduced or closed if price accepts below the level.
Then define what invalidates it. An invalidation is not simply, “I will see how it feels.” It might be a break and hold through a structural level, a change in market behavior that removes your edge, or a preplanned loss threshold. The right exit depends on the structure and the day. What matters is that you decide before the position becomes emotionally expensive.
Expiration is also an exit decision. Holding a 0DTE position to the close may be part of a tested plan. It is not automatically disciplined. As expiration approaches, small moves can change risk quickly, liquidity can change, and the remaining premium may no longer justify the exposure. Know the settlement and product specifications for the contracts you trade before relying on any expiration plan. The Cboe SPX contract specs detail cash settlement and expiration timing.
Run a Pre-Trade Process, Not a Prediction Contest
A repeatable trade takes minutes to prepare because the decisions are already organized. Before placing an order, check four things:
- The maximum loss per contract and total position risk
- The market condition and the structural reason for the trade
- The level or event that invalidates the thesis
- The planned management decision if price moves, stalls, or accelerates
That process exposes weak trades early. If you cannot state the reason for the position in one or two sentences, you are likely reacting to noise. If your management rule changes as soon as you see the potential loss, it was never a rule.
Use a risk graph before entry. Here is reading the payoff graph in detail. Look at the position not only at expiration but also at several times before expiration. A graph reveals the part traders tend to ignore: a position can have a comfortable expiration range while still becoming difficult to manage during a fast intraday move.
This is especially relevant for short-premium 0DTE structures. The path matters. A trade may eventually recover, but a framework built on hoping for recovery is not a framework. It is delayed decision-making.
Size for the Losing Streak You Have Not Seen Yet
The first test of sizing is not whether you can tolerate one full loss. It is whether you can execute the next valid setup after several ordinary losses without changing your rules.
Small size gives you information. Oversize turns information into trauma. When the P&L is large enough to make you freeze, chase, or override exits, you have exceeded your functional size, even if the position is technically defined risk.
This is why a trader can be correct about direction and still trade poorly. A good read with bad sizing creates fragile results. A modestly profitable framework with durable sizing can survive the variance required to evaluate it.
Avoid the urge to repair a losing trade by adding more risk automatically. Adjustments can be valid only when they are part of a defined playbook, maintain an acceptable maximum loss, and improve the position’s actual risk profile. Adding contracts because the market “has to come back” is not adjustment. It is a larger bet wearing a smarter name.
Review the Process After Every Session
Your trade log should capture more than entry and exit. Record the market condition, chosen structure, planned risk, actual risk, thesis, management decisions, and whether you followed the plan. A screenshot of the risk graph and relevant levels can make review far more useful than a P&L number alone.
Then separate execution from outcome. A losing trade taken and managed according to plan may be good work. A winning trade that violated size or exit rules is evidence of a problem. If you reward bad process because it paid once, you train yourself to take the kind of risk that eventually matters most.
Over a meaningful sample, look for patterns. Are losses clustered on trend days? Are you entering too late after the move has already happened? Are specific structures difficult for you to manage? The goal is not to make your log prove you are right. The goal is to make it show you what to change.
FatTail.ai teaches this as an operating process: read the structure, define the risk, execute the plan, and review the evidence. Not signals. Not alerts. Not borrowed conviction.
The next time SPX starts moving fast, resist the urge to make a heroic call. Build the position you can explain, size it so the loss is survivable, and let your process do the work. Independence in trading is built one controlled decision at a time.
Frequently Asked Questions
What does defined risk mean in SPX?
A defined-risk position has a known worst-case loss at entry (excluding ordinary execution differences and fees), usually because every short option is protected by a farther-out long option, as in a vertical credit spread, iron condor, iron fly, or butterfly. You should know your max loss, where it occurs, and how much of your risk budget it uses before entering.
How do you trade defined-risk SPX without guessing?
Start with the risk budget, not the chart. Set a fixed risk unit, size contracts from the structure’s maximum loss, choose a structure that matches the market condition, run a pre-trade checklist, and review the process afterward. It is positioning over prediction, not calling the next move.
Is a credit spread low risk?
Not automatically. A credit spread has a high probability of expiring out of the money, but defined risk comes from the long option capping the loss, not from probability. On a wide spread, the credit can be small while the loss potential is many times larger. Small credit does not mean small risk.
How do you choose the right defined-risk structure?
Match it to the condition you are actually trading. A range-oriented structure fits balanced price around a defined area with sufficient implied movement; a one-sided spread fits acceptance away from a level. Near major positioning, proximity that creates opportunity also creates faster risk. No trade is a valid choice.
How much should you risk per SPX trade?
A small, predetermined portion of capital as a fixed risk unit, and treat multiple positions as one book of open risk. The real test of sizing is whether you can execute the next valid setup after several ordinary losses without changing your rules. If the P&L makes you freeze or chase, size is too large.
FATTAIL BRIEFINGS
Get FatTail briefings in your inbox
Pick the lists you want. FOMC Alerts is selected by default.